Hot Wheels Display Case: 4 Tiny DIY Ideas for Big Impact
Hot Wheels, those iconic 1:64 scale diecast cars, have been igniting the imaginations of collectors and enthusiasts for decades. Whether you’re a seasoned collector or just starting your journey into the world of miniature speedsters, finding the perfect way to display these vibrant and coveted vehicles is a pursuit in itself.
The thrill of the chase isn’t limited to acquiring the latest releases; it extends to creating a showcase that does justice to the sheer awesomeness of your Hot Wheels collection.
In this post, we’ll explore innovative and practical ways to turn your Hot Wheels into a captivating display, ensuring each tiny car gets the attention it deserves. Buckle up because your collection is about to take center stage.
Wall-mounted Hot Wheels Display Rack
The affordable IKEA HEJNE shelving units can quickly transform into an eye-catching Hot Wheels display case. Zlatko shows us how to hack a large Hot Wheels display rack for your collection. Grab your tools, and let’s transform those shelves into a miniature car showcase that’ll house your entire Hot Wheels collection.
Materials:
IKEA HEJNE shelves x 2
IKEA HEJNE post x 2
Wood screws (35mm and 45mm)
Sandpaper
Wall plugs
Tools Needed:
Hammer
Pliers
Drill and drill bits
Screwdriver
Step 1: Dismantle the HEJNE shelves
Start by dismantling two HEJNE shelves. This step is all about breaking down the structure into its basic components.
Step 2: Salvage the Planks
Use a hammer to gently knock the wood planks out of the L-shaped wooden supports. Salvage the planks that will soon be the platform for your mini speedsters. Set the L-shaped wooden supports aside. You will need one of them later on.
Step 3: Prepare the Planks
Remove any remaining nails, smoothen rough edges, and loose timber with sandpaper.
Step 4: Assemble Your Hot Wheels Display Case
Lay out the two HEJNE posts on a flat surface and start screwing the slats onto them. Zlatko recommends using the existing holes in the HEJNE posts for easy assembly. Opt for 35mm and 45mm timber screws to secure the planks, ensuring they are level and centered.
Step 5: Hang It Up
Once the assembly is complete, it’s time to give your Hot Wheels Display Case a prime spot on the wall. Use one of the L-shaped wooden supports to mount it in place.
Fill up with your prized cars, and you’re done.
A Practical Hot Wheels DIY Grid Display
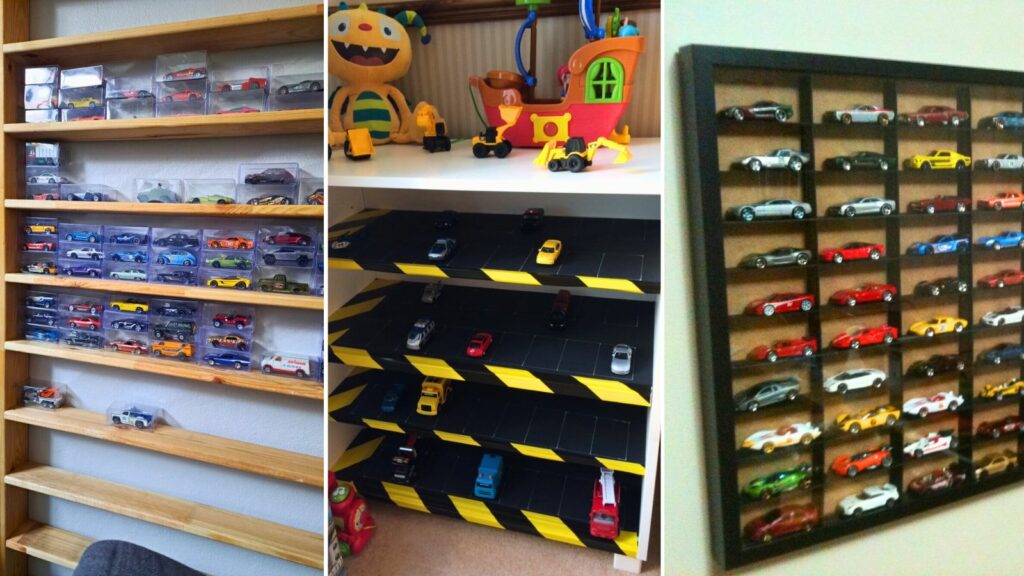
Chris S from Toronto, Canada, has a practical solution that uses the interior depth of an IKEA RIBBA shadow box picture frame. This DIY grid is functional and easy to assemble without glue.
The RIBBA shadow box picture frame is no longer available in many markets. The SANNAHED frame will work for this hack.
Materials Needed:
RIBBA shadow box picture frame
Black illustration board
Ruler
Utility knife or scissors
Cutting mat
Step 1: Measure and Confirm
Check the interior depth of your IKEA picture frame, ensuring it’s approximately 3cm (1.2″) or more for compatibility with the width of Hot Wheels cars.
Step 2: Determine Cell Capacity
Based on your preferences and the size of your Hot Wheels, each grid frame can hold up to 50 cars. Adjust the dimensions to optimize space if you have other Hot Wheels vehicles like trucks.
Step 3: Purchase Black Illustration Board
Acquire a black illustration board from a local art supply store. This material will form the dividing grid for your Hot Wheels car collection.
Step 4: Cut Interlocking Strips
Cut the illustration board into interlocking strips using a ruler and utility knife or scissors, eliminating the need for glue during assembly.
Step 5: Assemble the Grid
Piece the interlocking strips to create a grid that fits snugly within the shelving unit. Adjust the layout as needed to accommodate your collection.
Step 6: Assemble the picture frame
Place the plastic protection in front to keep dust out. Then, slot in the grid. Add in the cars before closing the picture frame with the backing mat.
Chris S.’s practical DIY grid offers a simple and efficient way to showcase your Hot Wheels collection. You can transform your shelving unit into an organized and visually appealing Hot Wheels display case with minimal fuss. Make as many frames as you need to house your diecast cars. Since these are already picture frames, they are an easy-hanging option to display your model cars.
Hot Wheels Toy Car Park Display
Sarah has an old IKEA shoe cabinet, possibly a discontinued model. This hack can be easily replicated on a BILLY bookcase. They removed the sliding doors, added black paper with parking bay markings using a white pen, and used yellow and black chevron tape to enhance the industrial look. The kid loves the toy car park display shelf, and it also solves the issue of tripping over tiny cars in the kitchen.
Miniature Car Display Using IKEA Picture Ledges
Saar Machtinger aimed for a stylish showcase for his collection of miniature coal-made cars. To achieve this, he linked seven horizontal IKEA picture ledges, connecting them with two additional picture ledges —one on each side—forming a cohesive and enclosed display rack. You can play with the height/ distance to fit your car models. The IKEA MOSSLANDA (or old RIBBA) picture ledge range will work for this DIY display case.
Shop for Hot Wheels Display Cases here.
The post Hot Wheels Display Case: 4 Tiny DIY Ideas for Big Impact appeared first on IKEA Hackers.