This DIY Kitchen Island is Actually an IKEA IVAR

Workspace in the kitchen of a rented home is often less than ideal. That’s the challenge facing Ehami, a Japanese DIY Instagrammer who shares her transformations on @ehami123.
Living in a rental, Ehami wanted a solution aligned with her approach of using removal and non-damaging methods and materials.
Her thoughtful response to this dilemma was the creation of a functional and stylish DIY kitchen island that could be easily assembled and taken apart without altering the original condition of the rental.
Repurposing the old with the new
IKEA items:
IVAR side units x 2
IVAR drawers
OBSERVATÖR cross brace
Other materials:
Pine boards
Pinewood battens
Architectural film
Brackets, screws, etc
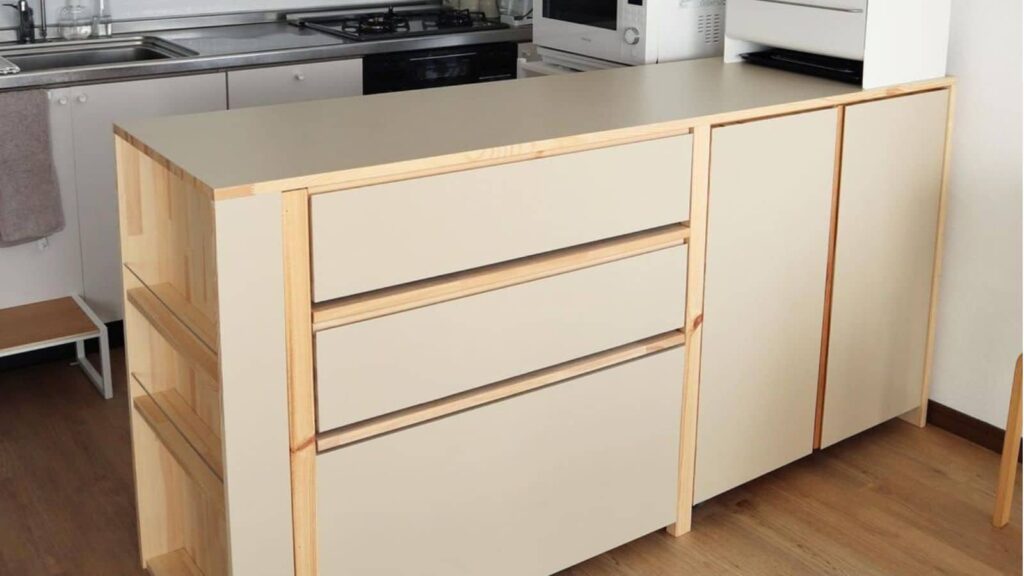
She already had an IVAR cabinet (19 3/4″ / 50 cm deep) for a few years and decided to use it as the kitchen island’s main base. She added two shortened IVAR side posts and two IVAR drawers to the structure. This new structure is next to the IVAR cabinet to extend the island’s footprint.
The island is placed in front of the existing kitchen setup, forming a galley kitchen and separating the kitchen and dining areas.
DIY Kitchen Island Frame
Once she had the base in place, it was time to enclose the island. Ehami built a U-shaped frame using pine wood and battens. She constructed the frame to fit snugly over the IVAR units. On the open end of the U, she installed shelves to create an integrated bookshelf, adding extra storage and display space.
She comments that the IVAR is quite strong, even on its own. “The enclosed U-shape makes it snug, and the depth is 50cm so that it won’t sway from side to side at all,” she replies to those concerned about the sturdiness of the kitchen island.
She made another board to cover up the front for the open space below the drawers. Items are accessible from the back of the unit.
Finishing the surfaces
To finish off the island, Ehami used Reatec, a durable, realistic, and flexible architectural film on the surfaces. Reatec provided a simple (but not inexpensive) way to add color and durability to the IVAR and pine surfaces. She chose a neutral cream color, the one she used on her kitchen table.
The result was a functional and beautifully finished DIY kitchen island within Ehami’s budget. She transformed her kitchen into an organized workspace by getting creative with modular storage units and simple enclosure and finishing techniques. The integrated bookshelf at the open end added extra practicality, too.
Fan favorite
Her followers love it, and her DIY kitchen island project has inspired others to do the same. One commenter says, “It’s amazing! I had just moved to a place and it did not have a perfect kitchen counter, so things were scattered all over the floor. So I was thinking of making one; I’ll give this a try!” Another says, “I feel like I want to change the inside of my house again.”
Her project was picked as one of the top 10 IKEA Hacks of 2023.
This DIY project shows renters can personalize and complete their space without major renovations. See all our IKEA Kitchen Island Hacks for more inspiration.
Other kitchen island hacks you may like:
An alternative kitchen island using trestles as a starting point for an island.
Just 4 things to complete this kitchen island
This is as easy as it gets. Just 4 IKEA items are needed to make a compact and affordable kitchen island.
Kitchen island with seating for 4
A fabulous kitchen island with seating for 3 to 4. The IKEA product featured here is the IKEA KARLBY walnut countertop and HEMNES chest of 8 drawers.
The post This DIY Kitchen Island is Actually an IKEA IVAR appeared first on IKEA Hackers.


