Building a DIY Home Flight Simulator: IKEA LACK takes flight

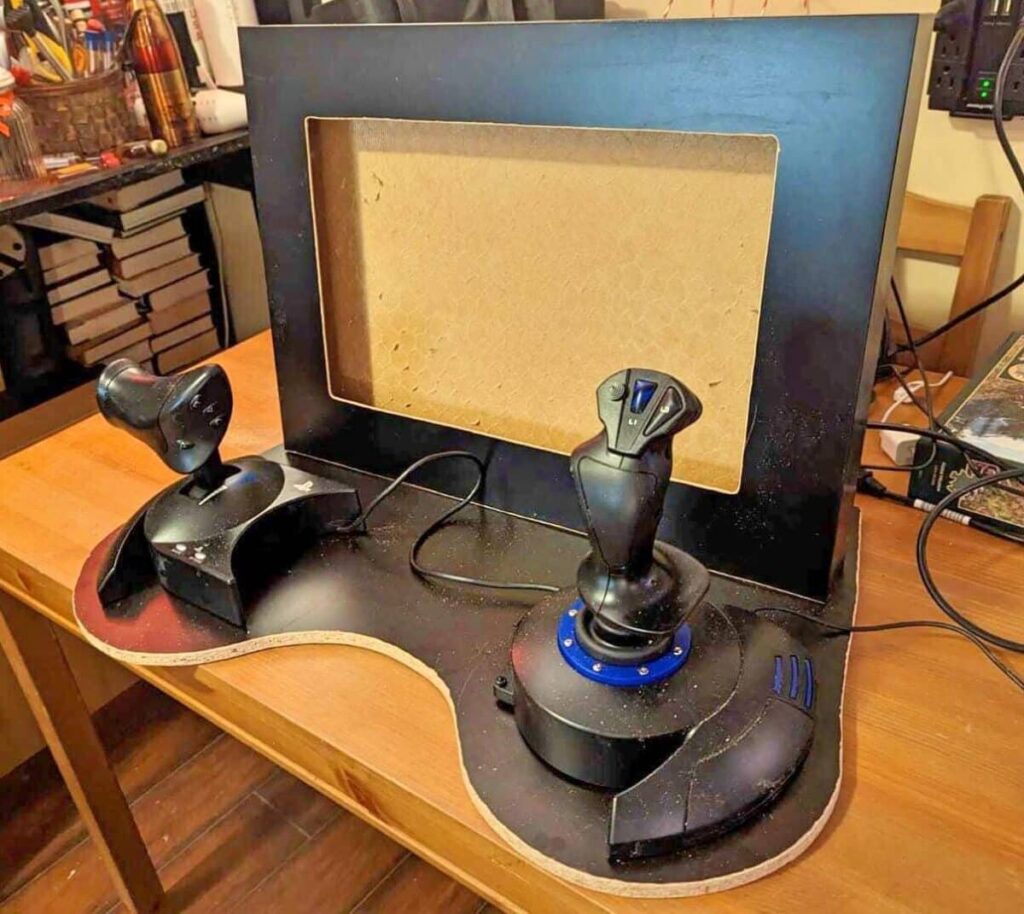
Eric Ferguson from Canada built an incredible homemade flight simulator for his seven-year-old nephew using a surprising material: IKEA LACK tables!
The secret lies in the tables’ hollow construction. Ferguson cleverly utilized the MDF shelf from a medium LACK coffee table to create the base and frame of the simulator. The main back piece came from an IKEA end table, perfectly suited for its hollow core.
Here’s the beauty of this project: IKEA LACK’s construction allows for easy modification. Ferguson simply drilled holes and used a jigsaw to cut out a perfect fit for the computer monitor. Many older LCD monitors, with a depth around 2 inches, fit perfectly within the LACK table’s hollow space. Mounting the monitor was a breeze – four metric screws secured it to the back, eliminating the need for additional hardware.
“It was fantastic to see this project come together so quickly,” Ferguson says. “Building a traditional box-style home flight simulator could have taken hours, but by using IKEA furniture creatively, it only took about 3 hours of work, and that could potentially be even faster.”
The flight simulation software used is SkyRogue, an arcade-style game known for its fast-paced flying action. Ferguson chose Thrustmaster T-Flight HOTAS controllers for the ultimate piloting experience. These controllers are USB plug-and-play, making setup a breeze.
Ferguson’s project proves that creating a fun and immersive home flight simulator doesn’t require a hefty budget or extensive woodworking skills. With a little IKEA furniture hacking and some clever thinking, you can build an unforgettable gift for the aviation enthusiast in your life.
IKEA Desk With Home Flight Simulator Setup
Another IKEA hacker, Norman shared his hacking transformation, demonstrating that a cross-country move and a minimalist lifestyle need not impede one’s passion for flight simulation.
“I moved across the country and did not bring any furniture with me, only belongings. I was looking for a desk to house my computer, but had some criteria,” he explains, “I like to flight sim on the PC therefore I had a yoke and throttle unit that I had to accommodate. Also, I needed a desk that did not have a front lip to allow for the yoke and throttle to clamp properly onto the desk.”
To further add to the challenge of finding a desk to fit his DIY flight sim set up, he had limited space and did not want a huge elaborate solution.
“In addition many dedicated gaming-desk type setups are quite costly,” he adds, “Compactness, simplicity, and ease of assembly/ modification (no access to a workshop here!) were important to my choice. I spent quite a while at the nearest IKEA until I thought up the following solution.”
The solution Norman devised is as clever as it is functional. He selected the MIKAEL computer workstation, a piece known for its simplicity and affordability. By assembling only the bottom half of the workstation, Norman created a spacious, open desk surface with the thick, lip-less edges that are ideal for clamping on his flight simulation controls.
To create a realistic positioning for his throttle quadrant, Norman repurposed the top piece of the MIKAEL desk, which was designed to hold filing stands. By attaching this piece with L-brackets to the CPU cabinet, he fashioned a sturdy outcropping that serves as a platform for his throttle. This innovative use of brackets allows for the plank to be easily removed, affording flexibility and easy access to the computer or for neat storage.
Norman’s small form factor PC fits snugly in the lower cubby. A larger PC will have issues fitting in the space.
An instrument panel
When he upgraded to a larger monitor, the original LCD was repurposed as a secondary display on the new platform, enhancing the simulator’s realism by serving as an additional instrument panel.
“You can see that the secondary monitor is bent far down enough such that you can pull out the desk and access the contents with no interference issues. As the monitor is pretty easily adjustable I can stand it straighter or fold it down depending on preference/need to get into the drawer,” he says.
Cable management, often a bane of such setups, was handled with IKEA’s cable tubing, discreetly secured to the back of the desk, keeping wires out of sight and maintaining the aesthetic simplicity of the workstation.
Norman’s IKEA hack is deceptively simple, requiring only the MIKAEL desk and eight L-brackets, yet it results in a compact, efficient, and home flight simulation environment.
“Four brackets are installed in the ‘L’ shape and four in the ‘7’ configuration. This means the plank is not held into the desk by screws, and can be easily slid out if you need to for example access the computer, or want to store it away for a neater appearance,” Norman explains.
Norman says the hack is “absurdly simple”, as it only requires 8 L-brackets in addition to the hardware you get in the IKEA desk pack.
To summarize, he says, “In all, I found it has worked out quite nicely. I get enough desk space on the top surface and have a great little compact but very effective flight sim setup. The ‘correct’ positioning of the throttle levers helps increase the immersion factor and the secondary monitor there adds to the experience as well.”
“In reality I found the MIKAEL workstation (without the top) to be a great compact computer desk for any need. I admit that my little modification might not have a lot of use for a lot of people but I’m sure in typical IKEAhacker-like fashion others might find inspiration to expand on the concept. Something similar would probably work well for people who have racing wheels on their computers as well.”
The post Building a DIY Home Flight Simulator: IKEA LACK takes flight appeared first on IKEA Hackers.


