Bright ideas for the IKEA wooden figure
The IKEA GESTALTA artist’s figure is a classic, posable wooden mannequin that is often found perched on the desks and shelves of artists and enthusiasts alike. Traditionally used as a reference tool for capturing the complexities of the human form in drawings and paintings, this simple yet versatile figure has become a staple in the creative world.
However, GESTALTA’s potential extends far beyond its initial purpose.
Creative minds around the globe have repurposed and transformed this unassuming piece into a myriad of artistic expressions. From elaborate handpainted pop icons to functional home decor and even as a canvas for intricate art projects, the GESTALTA is the starting point for fun craft projects.
IKEA’s Wood Figurine Takes Flight
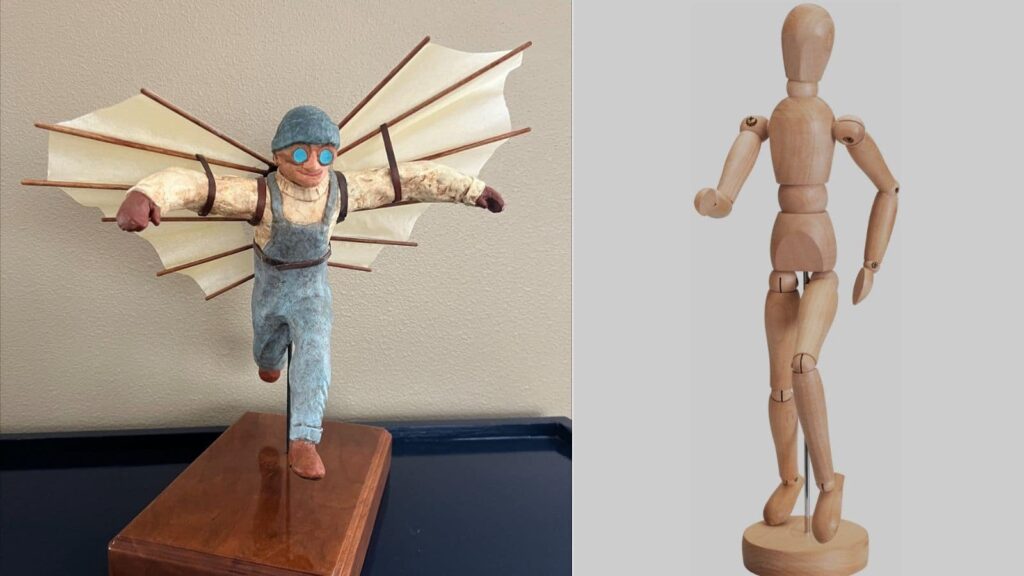
Portland artist Daniel Ward unveiled a charming sculpture called “Flying Man,” transforming the humble IKEA GESTALTA wooden figure into a marvelous piece.
The GESTALTA is a wooden figure commonly used by artists for drawing or as a decorative piece. The GESTALTA, with its basic wood finish and posable limbs, serves as the perfect canvas for Ward’s creative process.
This tutorial will provide you with a step-by-step approach to creating your own version of this unique IKEA hack.
Materials:
IKEA GESTALTA human figure model
Cloth scraps
Air dry clay
CA glue (super glue)
Wood glue
Office printer paper (optional)
Tissue paper
Cherry wood strips (thin)
Clear lacquer
Acrylic paint
Wood stain (optional)
Drill (optional)
Step 1: Prepare the Figure
Begin by positioning your IKEA GESTALTA model into the desired pose for your sculpture. To help maintain this position throughout the sculpting process, glue scrap cloth strips to the wooden figure using wood glue. This will also provide a textured surface for the clay to adhere to more effectively.
Step 2: Sculpt the Form
Once the cloth is in place and the glue has set, cover the model with air-dry clay. Sculpt the clay to add details and features to your figure, transforming it from a simple wooden mannequin into a dynamic “Flying Man” or whatever pose you prefer.
Step 3: Seal the Sculpture
After the clay has fully dried, spray a coat of clear lacquer to seal the surface and harden the clay. This protects your sculpting details and prepares the figure for painting.
Step 4: Paint the Figure
Apply layers of acrylic paint glaze to bring your “Flying Man” to life. Be patient and allow each layer to dry before applying the next to achieve a rich and detailed finish. Seal your paint job with another layer of clear lacquer.
Step 4: Construct the Wings
Cut strips of office printer paper and cherry wood to build the harness and wing framework. Glue the pieces together securely and allow them to dry completely. Once dry, you can paint, stain, and lacquer the framework to give it a finished look.
Step 5: Tissue Takes Flight
Use CA glue to meticulously adhere tissue paper onto the cherry wood framework for the delicate wing membranes. Apply multiple coats of lacquer to strengthen the tissue.
Step 6: Building the Base
The final step in the construction process is to prepare the base for your sculpture. Cut a piece of cherry wood to your desired size for the base. Stain it and apply a coat of lacquer for a glossy finish. Once the base is ready, drill a hole to accommodate the figure’s original metal support. This will secure the figure to the base and complete the sculpture.
Taking Flight with Your Creativity
Daniel took about 3 weeks to complete the entire sculpture process.
This is just a jumping-off point. Feel free to add your own artistic flair with different poses and materials. So, grab an IKEA GESTALTA figure and prepare to let your artistic creativity fly.
IKEA GESTALTA Hands Up For Light
A few weeks back, John spotted the IKEA GESTALTA wooden figure and felt an instant desire to add it to his collection. However, his wife wasn’t convinced.
‘There’s no use for it!’ the wife says.
So, John came up with an ingenious use for the IKEA GESTALTA wooden artist dummy. He transformed it from a decorative item into a useful one: a unique table lamp.
He first dismantled the wooden figurine and then made holes through the body and limbs for the wires.
“I got a couple of 3W Luxeon LEDs, took the GESTALTA apart, and wired it up through the limbs. I used a BASISK table lamp base, left over from a friend’s other project, to hide the electronic stuff,” he explained.
Taking it apart was easy, but putting the Pinocchio back together was a nightmare.
He used the base of an old IKEA lamp to house the electronics and set the model figure on.
John tested the brightness of the lamps without the lens, (pic, left) but the exposed LED was too harsh on the eye. With the lens cover the light was softer and more pleasant.
And the IKEA wood figure became an interactive table lamp. The figure still retains full mobility. View more photos on his flickr album.
The post Bright ideas for the IKEA wooden figure appeared first on IKEA Hackers.