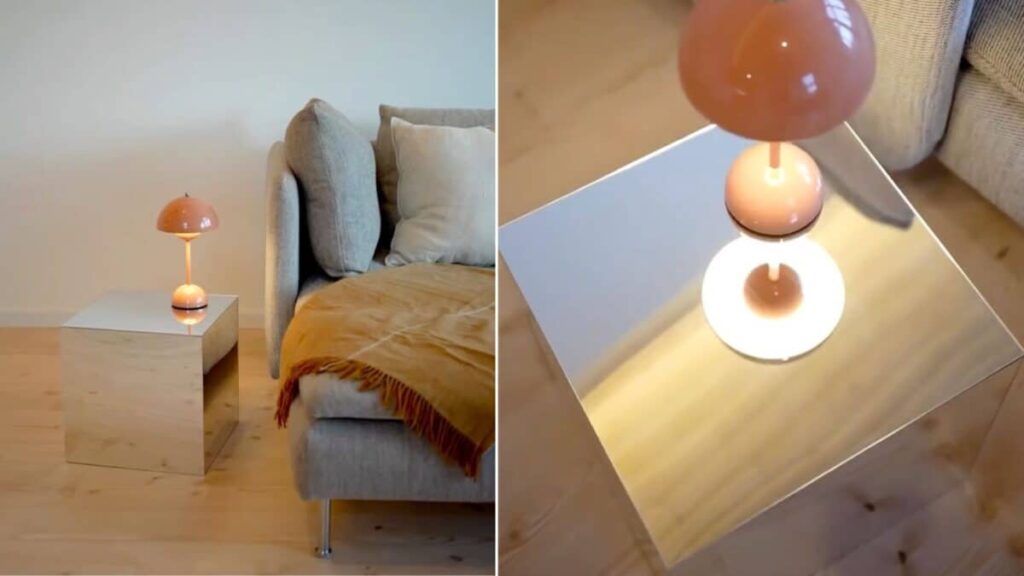
3 Easy Ways to Make a Mirror Table on a Budget

Have you ever dreamt of having a chic mirror table but found store-bought options too expensive? Look no further. These three tutorials will show you how to create your own DIY mirrored side table using IKEA items and a few supplies you can get from the hardware store.
1. Frank & Selli’s LACK mirror side table
Frank & Selli guide us through the straightforward process of hacking a DIY mirror table from a basic IKEA side table. The steps are easy enough, and you end up with an eye-catching piece of furniture.
While Frank & Selli used “mirrored plexiglass,” other materials like mirrored tiles or even reflective film could potentially be used instead, depending on your preference and desired final look.
Materials:
IKEA LACK side table (they used the smaller LACK side table (13 3/4 ” x 13 3/4 “), but any size could work)
Mirrored plexiglass with adhesive backing (cut to size based on your table dimensions)
Glass cutter (if you need to cut the plexiglass yourself)
Double-sided tape and cardboard
Safety glasses (recommended when cutting plexiglass)
2. DIY Mirror Table Hack
Assemble the LACK side table: Add strips of cardboard with double-sided tape to level up the legs to the tabletop so the mirror has a flat surface to stick on.
Measure your IKEA table: Determine the size of the mirror plexiglass pieces needed to cover the table surface. Measure the length, width, and any relevant features like rounded edges.
Cut the plexiglass (optional): If the plexiglass isn’t pre-cut to size, use a glass cutter and safety glasses to cut it to match your table measurements carefully. Make sure to follow proper safety precautions when cutting glass/plexiglass.
Clean the table surface: Wipe down the table surface thoroughly with a soft cloth to remove any dust, dirt, or debris that could affect the adhesive bond.
Apply the adhesive: Remove the adhesive backing from the plexiglass mirror and stick the mirror to the LACK side table.
Press firmly: Apply even pressure across the entire surface of the plexiglass to ensure good adhesion.
Repeat for remaining pieces: Repeat for each side until all sides of the cube are covered with mirrors.
Set in place: And your mirror table is done.
3. IKEA mirror table
Another budget-friendly option for a mirror table is to use the IKEA mirror squares. For a long time, the IKEA LOTS mirrors were the go-to stick on mirror tiles. Recently, IKEA changed its name to BLODLÖNN. The name is a lot less catchy, but the self-adhesive mirror works the same.
@homeofrith‘s tutorial on Youtube shows us how to piece together 6 pieces of IKEA LOTS mirrors into a side table.
While this mirrored side table adds a stylish touch, it’s not suitable for heavy items. Choose lighter objects for its surface.
Materials:
2 packages of IKEA LOTS 4 mirrors/pack (or BLODLÖNN mirrors)
Molding
Silicone furniture pads
How to make an IKEA Mirror Side Table:
Create a Stand: This is optional, but it will prop up the finished mirror table and elevate the look. First, cut the molding to create a square shape. While you’re at it, sand down the cut edges and spray paint the stand black or another color of your choice.
Assemble the Mirror Cube: Apply construction adhesive to 8 individual angle brackets. In each corner of the mirrors, place two brackets, allowing the mirrors to meet at a 90-degree angle. Continue this process with all four sides to form a cube structure.
Secure the mirror connections: Use masking tape to hold the assembled corners in place while the glue dries completely, following the manufacturer’s recommended drying time.
Attach the top and bottom: Apply adhesive to another 8 angle brackets. Attach these brackets to the bottom of the assembled mirror cube. Once dry, lay the mirror on the brackets, ensuring it’s level. Repeat for the top.
Finalize the Table: Attach the stand to the base of the completed mirror cube using additional adhesive. And your IKEA mirror cube table is finished!
DIY Mirror Coffee Table
This method is ideal for creating a large mirror table and requires a little more work. You’ll need to build a wooden base matching the dimensions of your mirror and then glue the mirrors to the wood base using silicone adhesive.
In her video, Josefine used the FULLEN mirrors, but other IKEA mirror options like LÄRBRO or LILLTJÄRN are also ideal. Pick a rectangle mirror if you want to make a mirrored pedestal or a long table. If you can’t find a mirror suited for your purpose, you can always get one cut from your local mirror and glass shop according to the dimensions you want.
Tap the video below for her DIY mirror cube tutorial, or go to our page for more IKEA mirror hacks.
Other mirrored furniture hacks you may like:
Make an affordable mirrored bedside table with drawers
Transform an IKEA table into an infinity mirror table
How to hack a vintage mirrored coffee table
The post 3 Easy Ways to Make a Mirror Table on a Budget appeared first on IKEA Hackers.


