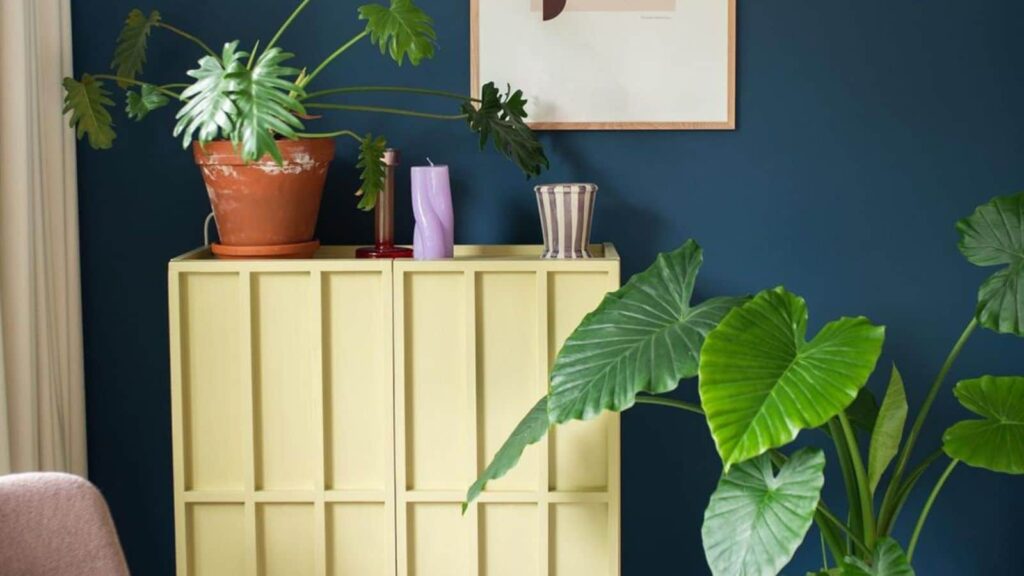
KitKat Door Style for a Sweet IVAR Cabinet Makeover

DIY enthusiast Keekshuis showcased a fantastic transformation of the IKEA IVAR, transforming the cabinet doors into a style reminiscent of the iconic chocolate wafer.
She admits that the DIY process was a trial and error and “not everything is as tight” as she would like. “But the overall turned out pretty nice, right?” she asks her followers on Instagram.
I agree, and I do love the classic grid design. In my mind, I also see it as a starting point. Other possibilities would be to omit the middle horizontal bars to create longer vertical sections. Or staggering the middle slats for a traditional tiled look. Then there’s a whole other vibe of diagonal slats. What a rabbit hole of possibilities.
But for now, let’s see how Keekshuis made hers.
KitKat Cabinet Door Style IVAR Hack
Materials Needed:
Spruce slats (18x18mm)
4 steel legs
Wood glue
Screws
Primer
Paint (satin gloss lacquer)
Sandpaper
Wall bracket (optional, for stability)
Step-by-Step IVAR KitKat Door Cabinet hack:
Step 1: Add legs
Begin by attaching four legs to the IVAR cabinet to raise the cabinet off the ground. Keekshuis used metal legs. She placed them slightly inward for a slimmer profile, making the cabinet somewhat shaky. You may want to stabilize the cabinet to the wall with brackets if you have young children.
Step 2: Sand down
Use sandpaper or an orbital sander to smooth out any imperfections. It’s easier to sand the cabinet before gluing on the trim. This step is integral to achieving a smooth paint finish. If necessary, sand the slats before fixing them to the IVAR cabinet.
Step 3: Add trim
Measure the IVAR cabinet and cut the spruce slats accordingly to create the grid pattern. To make the grid, use wood glue to affix them to the cabinet doors.
For the top of the cabinet, glue slats around the top edge, doubling the slats on top of the doors. Fill the groove handle along the side of the IVAR door with a small half-round slat to bulk it up before gluing on the trim.
Step 4: Priming and Painting
Prime the entire cabinet to prepare the surfaces for painting. Allow the primer to dry thoroughly. Apply two coats of satin gloss lacquer, allowing full drying time between coats. This will give the cabinet a polished look.
Step 5: Stability Considerations:
Keekshuis recommends securing the cabinet to the wall using a bracket if the leg placement introduces a bit of wobbliness. This step becomes especially crucial in homes with little ones. Alternatively, place the legs nearer to the outer edges for more stability.
Step 6: Optional Interior Finishing:
The inside of the cabinet doors can be left unfinished since it won’t be visible. But you can also fill it in and finish it neatly if desired.
Step 7: Admire the Finished Product:
Stand back and admire your revamped IVAR cabinet, now boasting a chic, custom look.
Other IKEA IVAR cabinet door styles you may like
Parquet doors
Corinne added Louis Cubes veneer parquet onto the IVAR doors for a 3-dimensional style.
Engraved door style
A captivating wall of IVAR cabinets with engraved doors. A one-of-a-kind cabinet art.
Sunburst cabinet
Alana combined two cabinets to create a large dresser with sunburst cabinet doors.
Multi-Color Style
It’s a fun way to use pots of leftover paint. The IVAR cabinets are solid wood, which is nice and easy to paint. Lightly sand them down. Paint a coat or two of primer to cover the knots if you don’t want them to show. Then, paint each IVAR door in a different color. Mix colors for new shades. Experiment and have fun.
The post KitKat Door Style for a Sweet IVAR Cabinet Makeover appeared first on IKEA Hackers.


