DIY pedalboard in 10 minutes using affordable IKEA products

Building your own pedalboard doesn’t have to be expensive or complicated. With a trip to IKEA and some out-of-the-flatpack thinking, you can craft a sturdy and stylish platform for your stompboxes.
IKEA offers a variety of items that can be repurposed into functional and affordable pedalboards. You can customize the size and layout and even add features to perfectly suit your gear and playing style.
1. Picture ledge DIY pedalboard
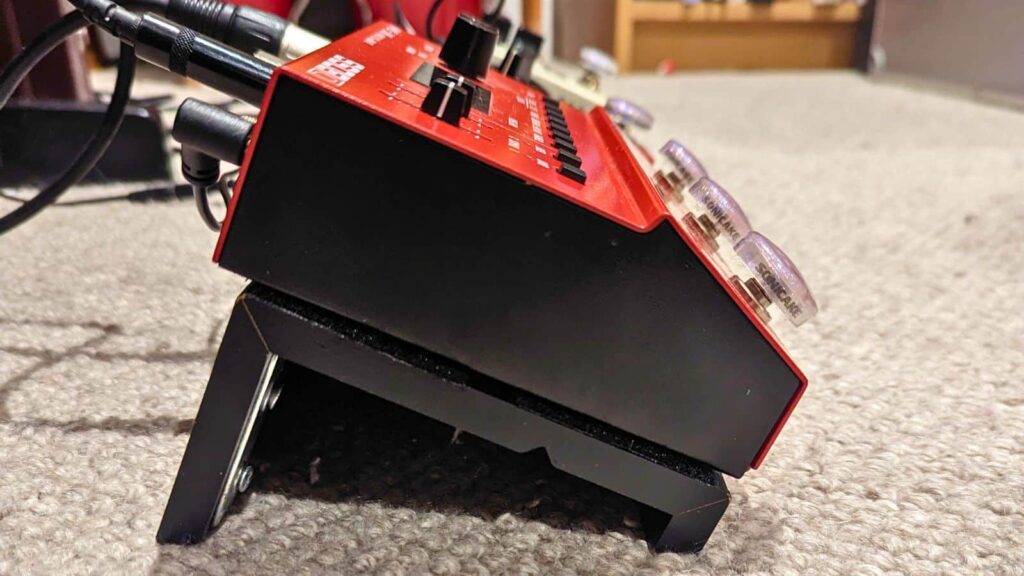
Turn a basic IKEA shelf worth £5 ($7) into a guitar pedalboard that normally costs significantly more.
I’m a bedroom guitarist with a small number of pedals that I wanted to tidy up. After looking up some videos on DIY pedalboard hacks, I ventured down to IKEA with a shopping list when I spotted a far easier option to create a basic pedalboard for 4-6 pedals:
Components:
IKEA MOSSLANDA picture ledge
2 small L-brackets
Screws and spacers
DIY pedalboard instructions
Screw the L-brackets into the 90-degree angle joint to create additional support. (This step might not be necessary, as the shelf looks pretty solid anyway, but I would like to be safe.)
Flip the picture shelf over and stick double-sided pedalboard tape along the entire width of the picture ledge. Having the tape run the entire length lets you rearrange your pedals as and when you need to. Stick the corresponding hook and loop tape to the back of the pedal.
Place your pedals on the tape, and you’re done.
Optional steps:
You can shave off the bottom edge of the MOSSLANDA shelf so it sits flush against the floor.
Add clips for cable management and tidy up power cables.
~ by A Tollworthy
2. DIY pedalboard from a coat rack
Why spend time and money searching for one when you can make your own fantastic pedalboard from IKEA in less than ten minutes?
Today, I went to the IKEA near my place with the goal of finding a pedalboard. And I found this great coat rack MACKAPÄR, which is actually TWO pedalboards ready to go!
Materials:
MACKAPÄR hat and coat rack
How to DIY a guitar pedalboard
1. Open up the MACKAPÄR coat and hack the rack. Attach just one of the curved bars to the long edge of the rack. (The original rack installation has two bars along both edges.)
2. Arrange your pedals on the mesh board until you are happy with the flow. If I ever expand my collection, there is still room for more pedals.
3. Then, attach the pedals to the MACKAPÄR with zip ties. (I hate Velcro in my pedals!)
So far, it works amazing! Thanks IKEA!
~ by J Aldo Do Carmo
3. $15 DIY pedalboard from cheap shoe rack
As a guitarist and dad, Garrett was searching for an affordable way to keep his effect pedals all secured with cable ties and easy to move as his toddler likes to rearrange them while he plays, disconnecting cables and cords.
Professionally built pedalboards (like these) can cost an arm and a leg. This was a flash of inspiration while looking for something else, as often happens at IKEA. See the full tutorial for a $15 pedalboard.
4. The Deluxe Pedal Board
Florian admits that this might seem a little decadent (though we honestly love the rock-glam), but aside from its practical use, it is excellent as a musician’s living room decoration. See more of the wood pedalboard with lighting.
5. Extra large custom pedalboard
Mikael needed a pedalboard with lots of space and easy to take to a gig. His set-up is perhaps a bit unusual, but it fits a motherload of pedal effects and gear. See the XXL pedal case in detail and view more photos.
6. Pedalboard crates
Ray took the IKEA GORM shelves (discontinued; try the HEJNE shelves) and made a slim, compact pedal board case for guitar effects pedals. The box top encloses the bottom panel with the pedals, making it easy to carry around. See how he made the crate pedalboard.
7. DIY pedalboard case
Since the kids had grown up, Yiannis no longer needed the changing bed. What better way to reuse the SNIGLAR changing table than to hack it into a pedal board case?
8. Metal pedalboard
The pegboard-like metal ALGOT shelf was ideal for this DIY pedalboard. The brackets lifted the board off the floor, and FIXA floor protectors made sure the floor was free of damage. The holes in the metal pedalboard made it easy to tie the pedals down and rearrange them when needed.
The post DIY pedalboard in 10 minutes using affordable IKEA products appeared first on IKEA Hackers.


